
How come tiny aftermarket firms can make a nicer set of rearsets than bike manufacturers supply as standard? We headed to the LighTech factory in Italy to try and find out.

Mmm, shiny.
LighTech are one of many small European firms manufacturing aftermarket parts for our bikes. Without the resource or backing of the original manufacturer, they’re making stunning aftermarket components that offer something more than the original components. It can be adjustability, improved looks or even better crash protection, but either way, you’re getting something that you feel makes your bike better. So why don’t the manufacturers do a better job as standard and how do companies like LighTech make stuff that fits properly and works on such a short time scale?
Bike manufacturers spend millions of pounds and thousands of man-hours developing new models. They have whole buildings full of engineers all beavering away on CAD (Computer Aided Design) machines fretting over fractions of millimeters and arguing with the felt-tip fairies (stylists) for changing seemingly irrelevant dimensions. Test riders will ride hundreds of thousands of miles in all conditions, reporting all the time to a man with a note pad who’ll take down measurements and observations before scurrying back to the safety of his computer. New bikes will be cut to pieces and analysed like some tacky sci-fi alien abduction scene long before we’ve even seen a spy shot or carefully drip-fed concept images. By the time some lucky bugger like me gets to ride one at a press launch, similar bikes will have been to hell and back, with no thanks other than being stripped to pieces and cut up for further inspection.
And then, within weeks of the first full-production bikes landing in shops, there will be catalogues full of aftermarket parts available to customize them. Those standard footrest hangers are ripped off and replaced with machined aftermarket rearsets. Some poor bugger spent weeks on a computer, analysing, improving, then arguing with stylists, suppliers and purchasing departments only for the fruits of his labour to be tossed in a box and replaced with something built in a tiny factory in Italy, entirely separate from the original manufacturer. Something beautifully designed, exquisitely machined and impeccably finished that makes you almost as excited as you were when you bought the bike in the first place.
So how does it happen?
This is the process LighTech go through when designing new rearsets for a bike.
Step 1 – Keep your scanners peeled
But not in the way you or I are thinking. Back when computers were just annoying boxes that promised to make life easier but did quite the opposite, the only viable route for the aftermarket manufacturer was to get out his ruler and get measuring. Now computers have given in and decided to be helpful, the measuring process can be fully automated and far more accurate. LighTech use a 3D scanner to measure components or entire sections of bikes, generating scan data accurate to 0.01mm. So for rearsets, in addition to scanning the mounting points, scans are taken of the original components for reference and the surrounding components to check for any potential clearance issues.
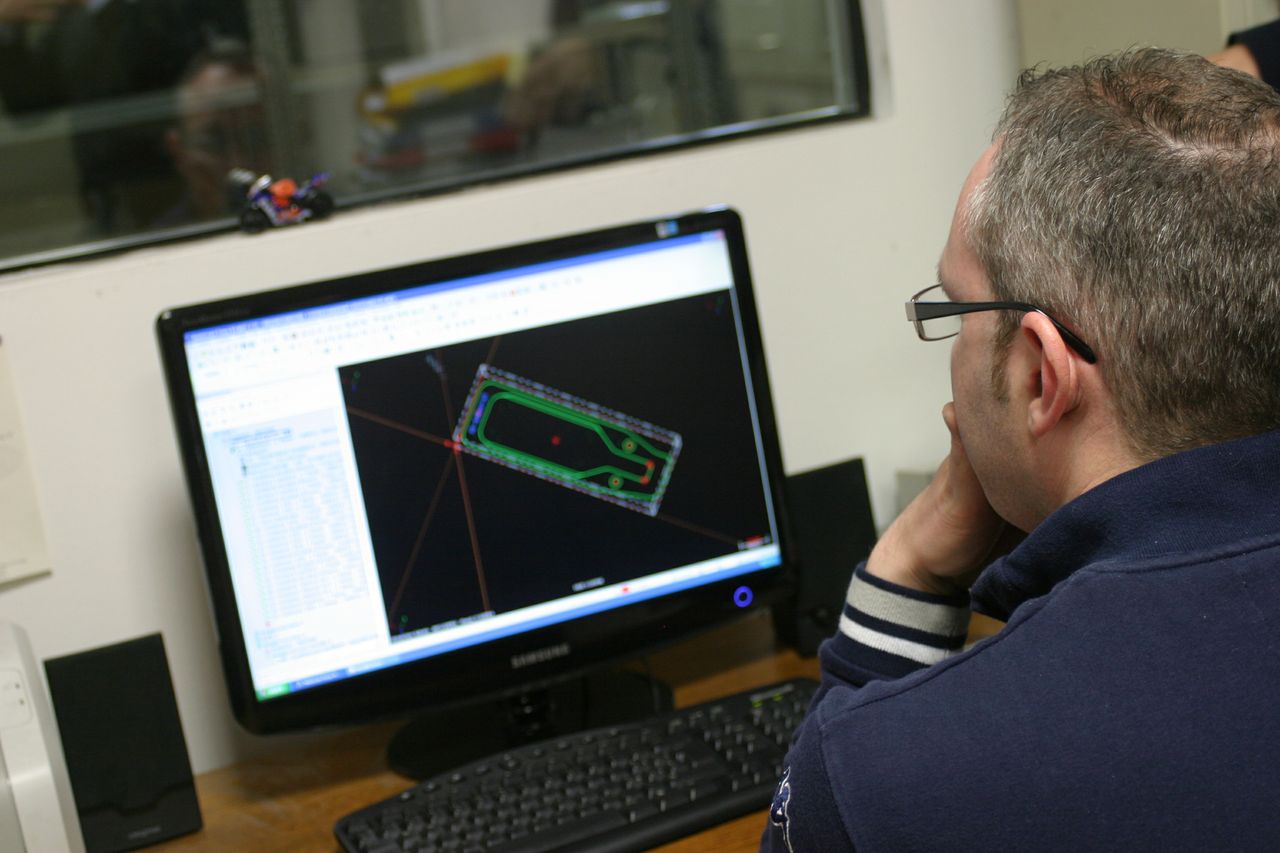
Step 2 – Start a modeling career
The scan data is then imported into a CAD program, where the 3D models of the final components will be generated. Essentially the scanned surfaces are used as a constant reference to check fitment and clearance of the new components – like a digital version of building a cardboard model and offering it up to the bike. This takes the guesswork out of the design process, giving engineers a nice warm fuzzy feeling, bless them. At this stage the stylist, who’s responsible for making things look all pretty, will work very closely with the engineer, who’s responsible for making things work and fit. What this usually boils down to can be likened to a couple of kids squabbling about which way round their toy cars should be parked. One wants them all in a neat line, in size order, the other wants to put all the red cars together, parked at jaunty angles.
Step 3 – Black magic
You should have heard of 3D printing by now, but that doesn’t make it any less mystical for us. It’s like a normal printer, except that instead of printing a picture of a thing, you can print the actual thing itself; black magic, I’m telling you. An easy way to imagine it is to think of a cube – now take one very thin slice of that cube, a cross-section if you will, and you get a square. The 3D printer will print that square, then move up a fractional amount, take another cross-section and print that. It builds up models one layer at a time until you have the 3D object. Think of it as using a normal printer to print a picture of a square. Print that square 1000 times, cut them out, stack them all together and you have a cube. Instead of using ink to print, a 3D printer uses a laser to ‘cure’ a plastic, bonding it together to build up the part.
Step 4 – Ch-ch-check it
In theory you shouldn’t need to check fitment and function with a physical model – with the scan data, all checks can be done in CAD. In reality, even with all the clever tech in the world, nothing beats having a poke and a fiddle with real live bits. Bolting on 3D printed components flags up stuff you can easily miss on the screen – one example would be checking if you can get a tool in to tighten bolts. As an engineer, this means you can quietly check stuff with minimal cost or time and, importantly without a factory full of people laughing at your cock up. So, once you’ve quietly established that your 3D-printed prototype works, you get the stylists opinion, the opinion of the guy who’ll be programming the machine to make it and the approval of the boss. In LighTech’s case the boss is ex-World Superbike privateer Fabrizio Furlan, who happens to have a handy family background in CNC machining. Once everyone’s happy and any changes have been made to the 3D CAD model, you’re ready to send the parts to the next piece of clever software.
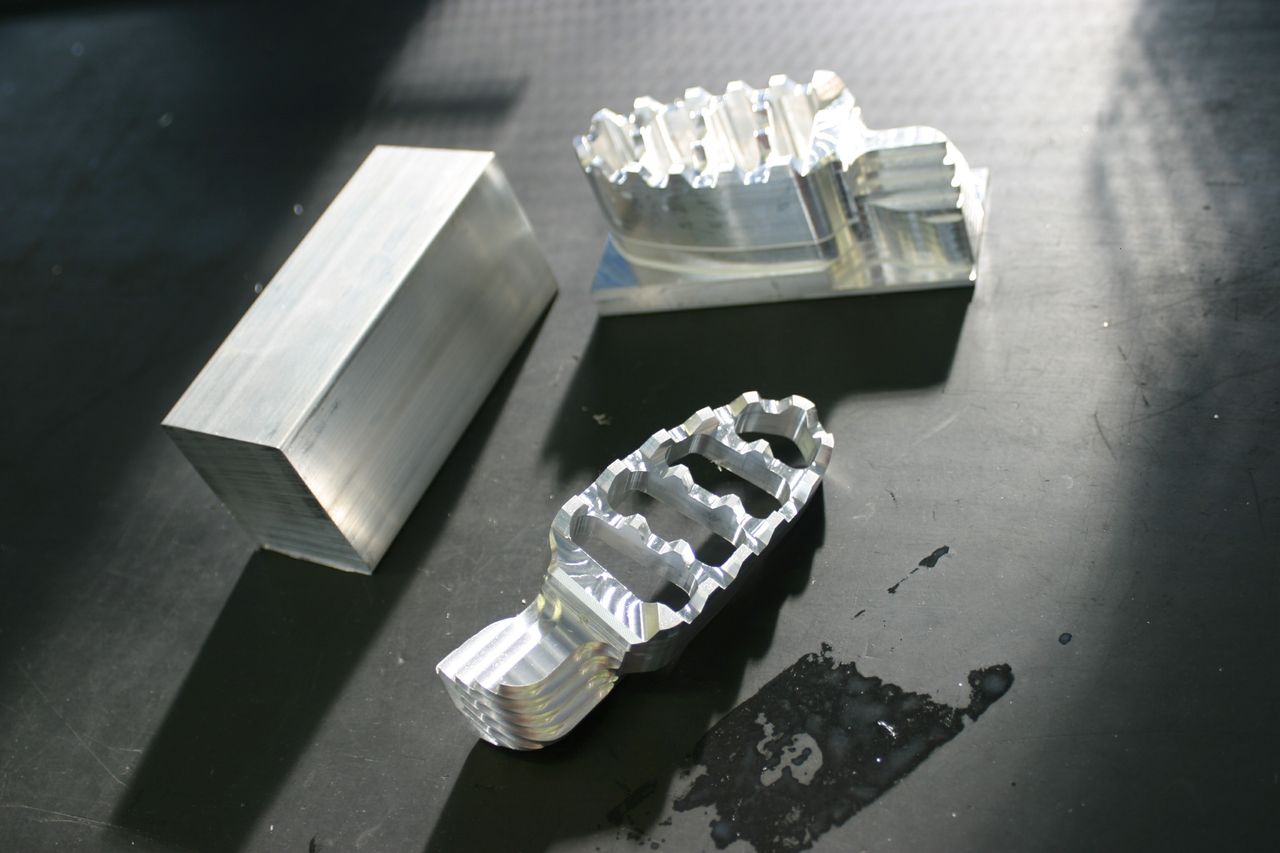
Step 5 – More acronyms – CNC programming this time
The finished 3D CAD model is then fed into a CNC (Computer Numerical Control) programming software. To make a billet aluminium component, like these rearsets, you start with a solid aluminium block and cut material away until you’re left with the shape you want. It’s a pretty wasteful process with regards to material, but you get excellent strength properties and a nice finish. You could do it yourself with an angle grinder or a file, but this would take forever and generate parts that look like they’ve been chewed up by a dog with particularly strong teeth. So, a milling machine is needed to accurately cut away material – again a manual one would do the job, but that is slow, labour intensive and open to human error. Bloody humans. This is where the CNC bit comes in – a CNC milling machine cuts away material according to a pre-determined program to leave you with the finished part. Once you’ve generated the program once, all you need to do is keep loading blocks of aluminium and taking out finished pieces twenty minutes-or-so later.
To generate the program, the 3D CAD model is imported into the CNC Programming software. The operator then defines all the paths taken by the machining tools, trimming, nibbling and chipping away at the original lump of metal until something beautiful is created. By developing and simulating the milling program on a computer, any expensive and violent mistakes involving an 8-foot high milling machine trying to smash its way through a solid lump of metal with no cutting tool in place can be avoided. Once the program is complete, it’s a case of feeding it into the machine, loading a lump of aluminium and waiting for shiny parts to appear.
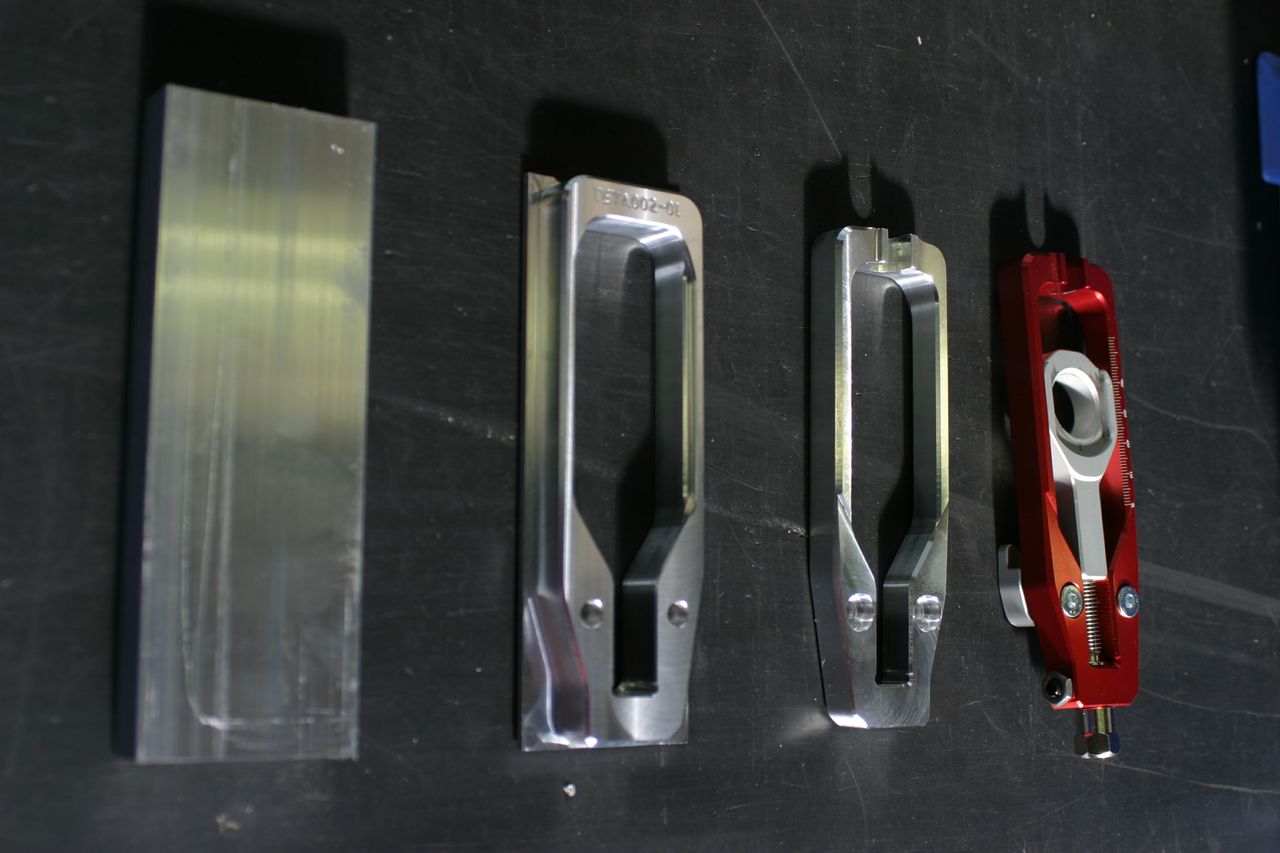
Step 6 – Apply make-up
Beautiful, machined, high-grade aluminium components do funny things to all men, giving us illogical urges to stroke them, hold them up to the light and, for some reason, sniff their highly finished surfaces. No? Just me on the sniffing then? Anyway, to offer the parts some corrosion resistance and give them a classier look, LighTech’s parts are anodized, mainly in a stealthy black. The individual parts of a set of rearsets are then hand-assembled and packed into ridiculously pretty boxes to be sent out. I’ve always wondered why the boxes for some aftermarket bits are so pimp, but according to the sales manager at LighTech, something simple like a change in packaging can make a huge difference to the number of sales. The theory goes that if it’s in a really nice, well made box, the stuff inside’s gotta be pretty sweet too.
So why aren’t the standard components this nice?
So, despite being a tiny company in comparison to manufacturing behemoths like Honda or Kawasaki, LighTech actually have some pretty impressive technology on their side. With 3D scanning and printing technology, they can quickly generate parts and models without having to crawl around bike dealers with a ruler and tape measure. This means that, even without access to the original CAD models of new bikes, LighTech can generate their own and make sure they fit without cutting up a single bit of metal. This gives them a head-start on the design front and after that they can work the remaining advantages of being an aftermarket parts manufacturer. For instance, Honda has to make a set of rearsets for the CBR600RR that are cheap, fit everyone, will pass homologation laws and are so easy to assemble that a half-asleep gibbon with Parkinson’s could do it in a dark room. During an earthquake. They also have to be cheap. Did I say that already? That’s because they really do have to be cheap. When you’re making 30,000 of something, the difference between a unit cost of £40 and £100 is pretty damn significant. Like one-point-eight million pounds significant. That’s why standard rearsets are made using faster, more cost effective methods than starting with a lump of metal and cutting it away to get what you want. The advantage for companies like LighTech is that they can make a more expensive, but far nicer product and sell it aftermarket. We’ll buy them because we want to customize our bikes, make them individual and look at nice shiny things.
Poking around the factory, I spot a few boxes with interesting names scrawled down the side of them. Names like ‘Tech 3’ and ‘Moriwaki’ set my MotoGP fan boy cogs whirring – that’s where I recognize the name from. LighTech supply bespoke components and services to the MotoGP paddock – you’ll see their handiwork in Bradley Smith’s MotoGP garage and all over the Tech3 team’s Moto2 bikes. It seems it’s not just me that was excited by the resources squeezed into LighTech’s little piece of Venice real estate.
Acronym Buster
Here’s a key to all the random letter nonsense you need to trick an engineer into knowing what you’re talking about or baffle friends into thinking you’re, like, well clever and stuff.
CNC – Computer Numerical Control
CAD – Computer Aided Design
SLS – Selective Laser Sintering
SLM – Selective Laser Melting
FDM – Fused Deposition Modeling
CAM – Computer Aided Manufacturing
DPMITEFBAS – Don’t Poke Me In The Eye For Being A Smartarse
Words: Chris Northover
Pics: LighTech